How the Dashlane Extension Is Getting More Modular with NestJS

Dashlane is using NestJS, a framework for building efficient Node.js server-side applications, in our web extension. In this blog post, I explain why and how we made this decision.
Creating a web extension’s architecture is an iterative process. In a living product like our web extension, just like in a city, building infrastructure takes time.
To allow the Dashlane web extension to evolve in the ever-changing web-extension ecosystem, we needed a more efficient technical organization. Thus, we decided to adopt NestJS, making it a critical part of the “urbanization process” of our extension.
Overview of an extension
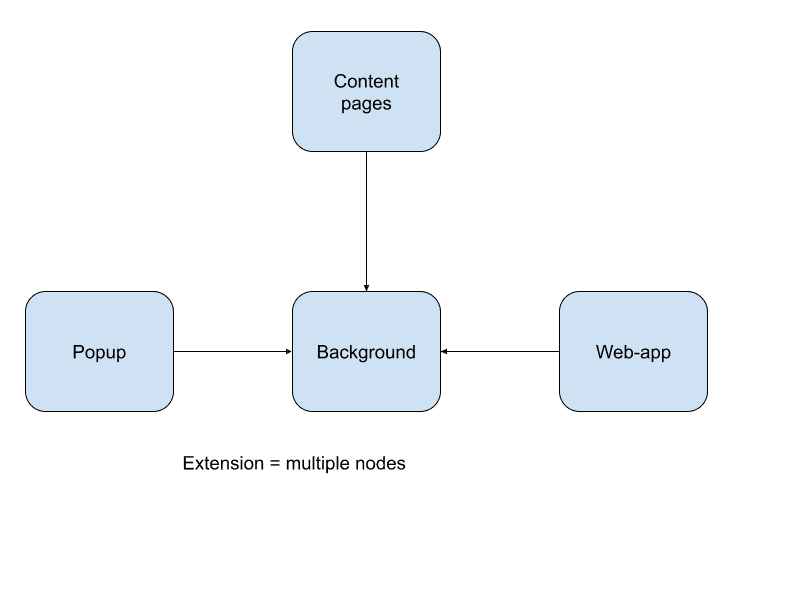
An extension is composed of components communicating through a background page. The communication is done via messaging. Compared to the usual web world, there’s no way for these parts to communicate through web requests.

A story about Manifest V3
Google holds 84% of the market share of our users’ browsers with Chromium-based Chrome and Edge. They are changing the web extension API to move away from a persistent background page to a service worker whose lifecycle is controlled by the browser. It’s not more persistent and can be terminated at any time to save resources. This is the main change brought about by Manifest V3.
Dashlane too must follow Manifest V3. Take a peek at what we did for MV3 in our previous blog post about it.
Because we needed to refactor our code to leverage lazy loading and state management enforcement practices, we decided it was time to re-write our architecture.
What did we do?
In web pages and the pop-up, we have a layer that forwards calls to a business layer. This business layer can be in the same context as the UI, or it can be in the background.
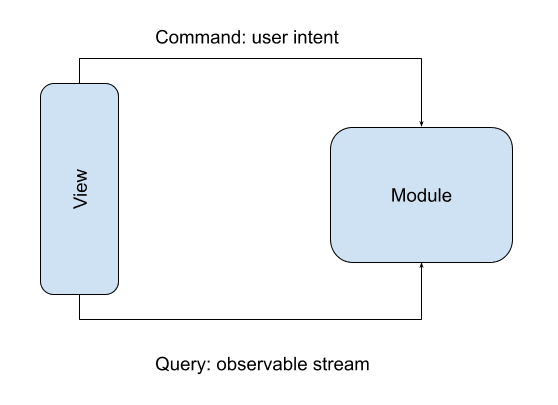
We introduced a central messaging layer between the UI and application modules. Since modules are bounded contexts, it makes sense to apply domain design in naming conventions. We therefore used the CQRS pattern instead of CRUD.
Application modules can also use this CQRS layer.
The CQRS layer dispatches the query in either a module hosted locally, such as in the web app, or hosted in the background.
We apply the CQRS pattern for the extension with the following specialization:
- A command is the expression of the intent of the user. Example: “As a user, I want Dashlane to create a new password for me.”
- A query is the ability of the system to inform the user. Example: “As a user, in order to fill in my login form, I need to know which accounts I have on this website.”
What is NestJS and why do we like it?
NestJS is a framework to develop service-based applications. When a request arrives, it triggers a pipeline and dispatches said request to its handlers, which provides a service.
NestJS has two functionalities we need to achieve modularity:
- Dependency injection
- Request handling
Shipping NestJS in a web application
NestJS is supposed to be a server-side framework. However, we use it in the background page of the extension, which isn’t a web server and runs on a navigator JS engine, not in NodeJS.
Shipping NestJS in a browser requires some polyfills for processes, buffers, and more, but it works well. See this GitHub page for an example of a NestJS app on a webpage using Webpack.
A reactive implementation of CQRS
Our primary UI technology is React. Our requirements for a UI system are to:
- Display to the user what they need to know
- Accept user intents
These two cases are what we call use-cases. For them, we apply the CQRS pattern because it allows domain-driven naming and separation of intent versus data reading.

All use-cases stream multiple values, which can be a success, a functional failure, or an exception. The primary result type of use-cases in JavaScript is therefore:
Leveraging NestJS pipelines
At Dashlane, we were looking for a solution that could enable us to:
- Split monoliths into testable chunks via dependency injection
- Disassociate use-cases from their implementations
- Have per-request scoped data and per-user scoped data
At first, we were looking at ts-syringe, but NestJS offers nice features:
- Per-request scoped providers
- Requests, pipelines, and controller logics
However, some points are not adapted to us:
- NestJS is based on web-requests, and web-requests are one-shot.
So we bridged use-case to handlers using NestJS.
As you can see, NestJS has an HttpServer abstraction that isn’t ideal for us because we have no real web server in the web extension. At the time of writing this architecture, the micro-service also required some adaptation. We went with a fake HTTP server.
NestJS dynamic modules
One thing we need to be cautious about with NestJS is the boot time. At Dashlane, in Manifest V3, we need to boot the application fast when something happens. Essentially, we want to autofill web pages without making the user wait. We did some benchmarks (at the time, on NestJS 8) and found that the boot-time of the NestJS app is proportional to the number of modules.
However, we identified the source of the slow-down: A method is called to tag an identity token to all modules to give them unity tokens. As of the redaction of this document, we do not yet have enough modules to suffer from the announced slow performances.
This benchmark needs to be redone, as promising improvements have been merged to NestJS-9, such as !11023. If these aren’t enough, we still have the option to investigate building these tokens on build-time rather than execution time.
Meanwhile, we do not use the dynamic modules as they take longer to start. Instead, modules can get their configuration by declaring a configuration dependency injection token that will be provided by the start of the extension.
For example, we have an anti-phishing module that depends on a set of services from a Remote-file-update module, which injects a configuration dynamically:
This replaces the usual way of Nest for doing dynamic modules:
Module static configuration is passed with a special configuration property on our NestJS wrapper. This allows passing it at the application entry point:
Per user singletons
We plan for the Dashlane extension to support multiple accounts, letting users have a professional and a personal account. At the time we built our framework using NestJS, durable providers didn’t exist. We ended up making a factory with a cache to create a service per user. Modules needing per-user singletons are doing this with an async provider:
The userScopedSingletonProvider adds a hidden cache and makes sure the factory is called only for users whose services are not in the cache.
We may switch over to multi-tenant, but this isn’t yet planned.
State management
All services and providers should be stateless in our application. This is due to one of MV3 constraints: The application can be killed at any time. Stateful components should be limited to what we call Stores. Stores are declared like this:
They expose a set method and a state$ observable stream. When updated, our framework will seamlessly encrypt the store content using a key specific to the user (the key can only be decrypted when the user logs in with SSO or a Master Password).
The stores will be constructed and read-only when needed using NestJS dependency injection (and our singleton layer).
On MV3, Stores use the storage.session web extension API to allow modules to quickly resume their boot phase without loading data from local storage (which is costly due to decryption).
CQRS API and Handlers
We decided not to leverage NestJS CQRS features for two reasons:
- Nest JS CQRS Queries still return a single value. We want a stream in our application. When given observables, NestJS only uses the latest values of them.
- It brings the notion of aggregate-root. As of today, we (Dashlane web framework maintainers) are encouraging devs to isolate code using handlers, which is already a change of philosophy. The added complexity of Aggregate Root was not our priority.
A module CQRS API is described declaratively in contracts:
Command and queries are classes defined as such:
When declaring a module, we bind the CQRS contracts to handlers in the Module decorator:
Here, handlers are special providers that can handle command, queries, or events (but that’s not covered in this blog post):
Using ModuleRef to create handlers in our controller
In our controller, we’re using the ModuleRef object provided by Nest to instantiate handlers manually. When a “HTTP query” arrives, our framework knows the handler type for it and instantiates it:
Wiring queries to the UI
Devs are provided with a helper React-hook useModuleQuery that sends the query through the CQRS broker, then Nest pipeline:
The react hook provides a real-time, reactive stream on the module. Under the hood, it uses a React context to get a CQRS Broker to trigger the NestJS pipeline. The value obtained can be sent to a prop of a component.
Conclusion
Using NestJS in our application has provided benefits to our developers: A lot less boilerplate is needed to wire handlers to the view (only API declaration and handlers). It also helps in mocking module data during tests.
Since we have our own framework that’s wrapping NestJS primitives, we should, in theory, be able to change NestJS for something else if we wished to.
What’s next for Dashlane and NestJS?
- Evaluate bootstrap performance in NestJS 9
- Evaluate multi-tenancy
- Evaluate micro-service approach
- Evaluate nullable-pattern feasibility in NestJS for integration testing
Technical references
Do you want to dive more into the technicalities? Our web extension is not open-sourced yet, but you can look at the specs of what we use:
Sign up to receive news and updates about Dashlane
