5 Ways Dashlane Just Improved Its Autofill
Life is hectic, and we’re firm believers in finding ways to make the day easier. Dashlane’s Autofill feature makes logging in effortless, but our customers pointed out a few things that could be a bit better. We appreciate the feedback and are always listening as we work to improve Dashlane’s features.
Our latest Autofill improvements make it even easier to log in on desktop. Quickly save and update passwords, search, and more—all without leaving the Autofill menu. Read on to learn what’s changed and how you can try these enhancements out for yourself.
- Save and update passwords more quickly with Autofill
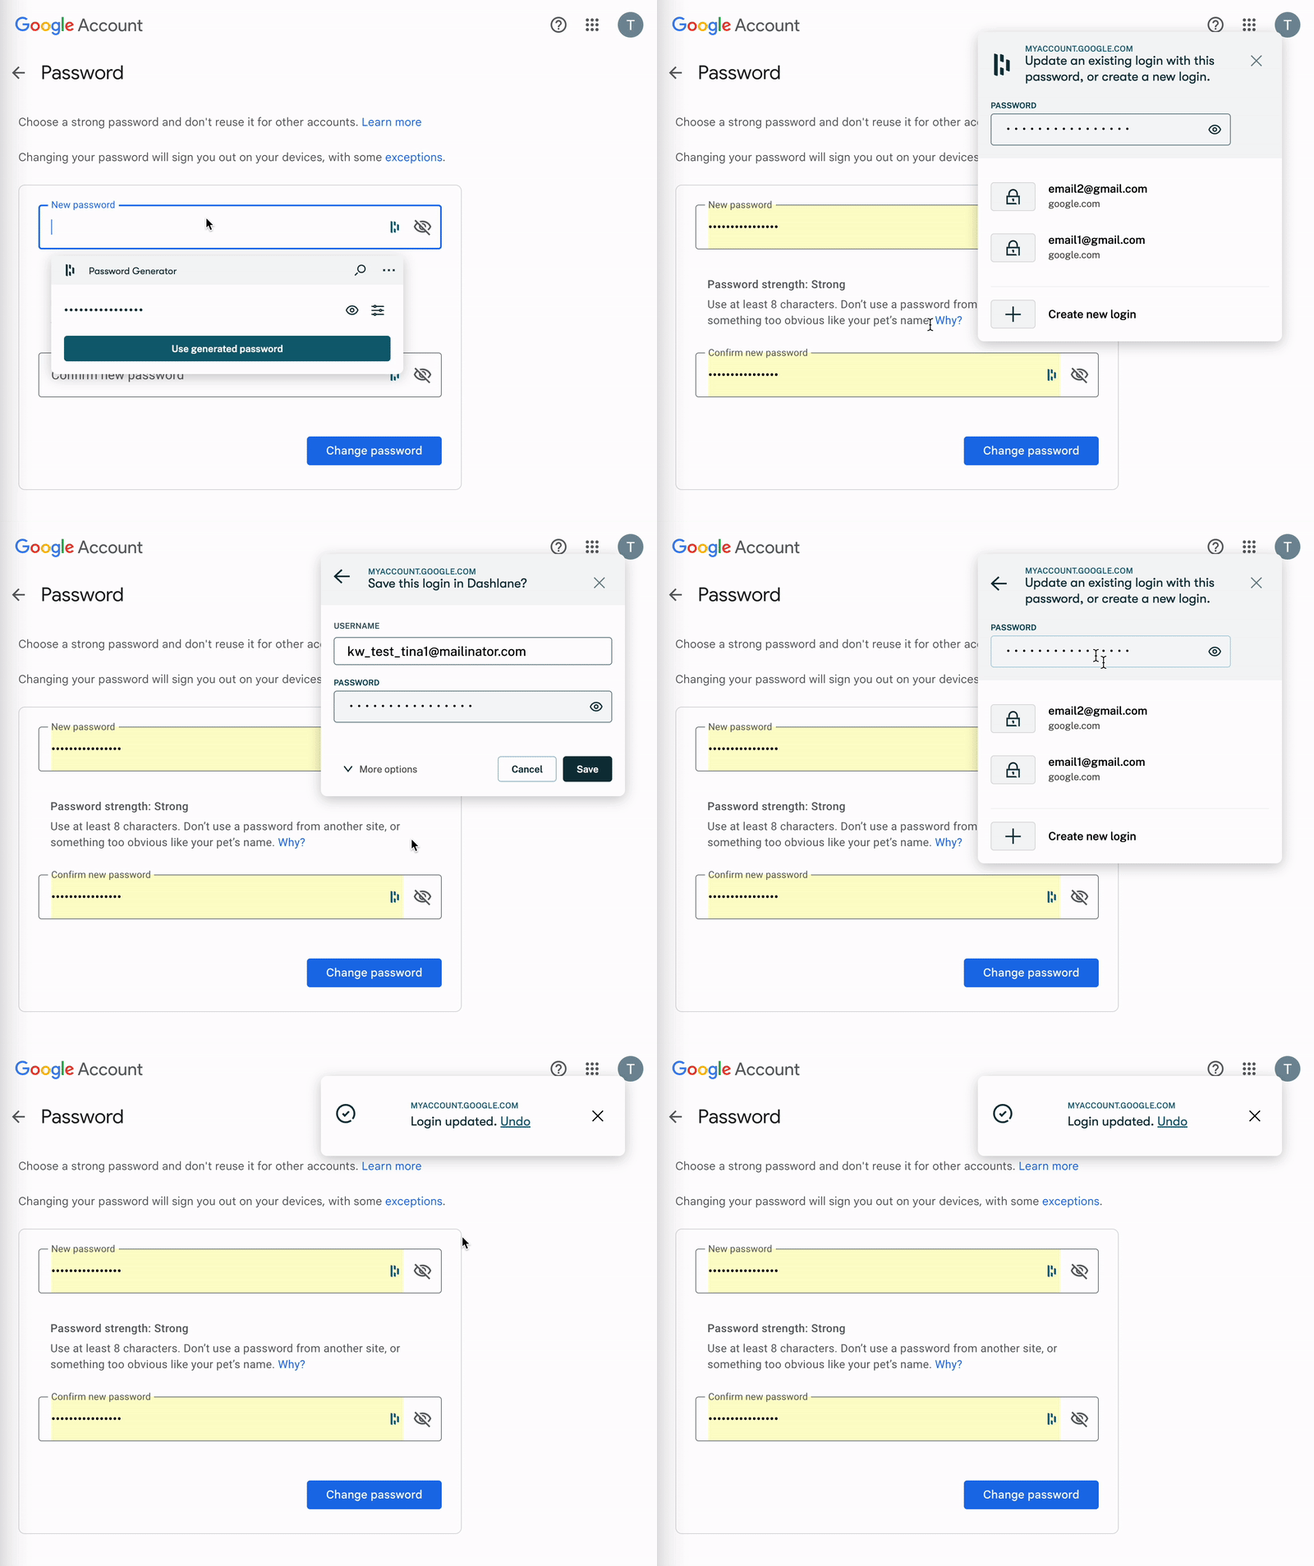
Before: Updating an existing password or saving a new password while in an online text field was a little confusing. Saving or replacing a password without having to open Dashlane was convenient, but it wasn’t always clear what exactly was being saved to the vault.
Now: It’s much easier to update an existing password or save a new one after filling it in a form. You have more control over how Autofill captures and saves data into your vault with the added context of staying on the page you’re filling in instead of having to open the web app for more details. And if you move too quickly on an update, no sweat—we’ve added a handy undo button.
Supported platforms: Dashlane extension (Chrome, Edge, Opera, Firefox)
- Search for items in the Autofill menu
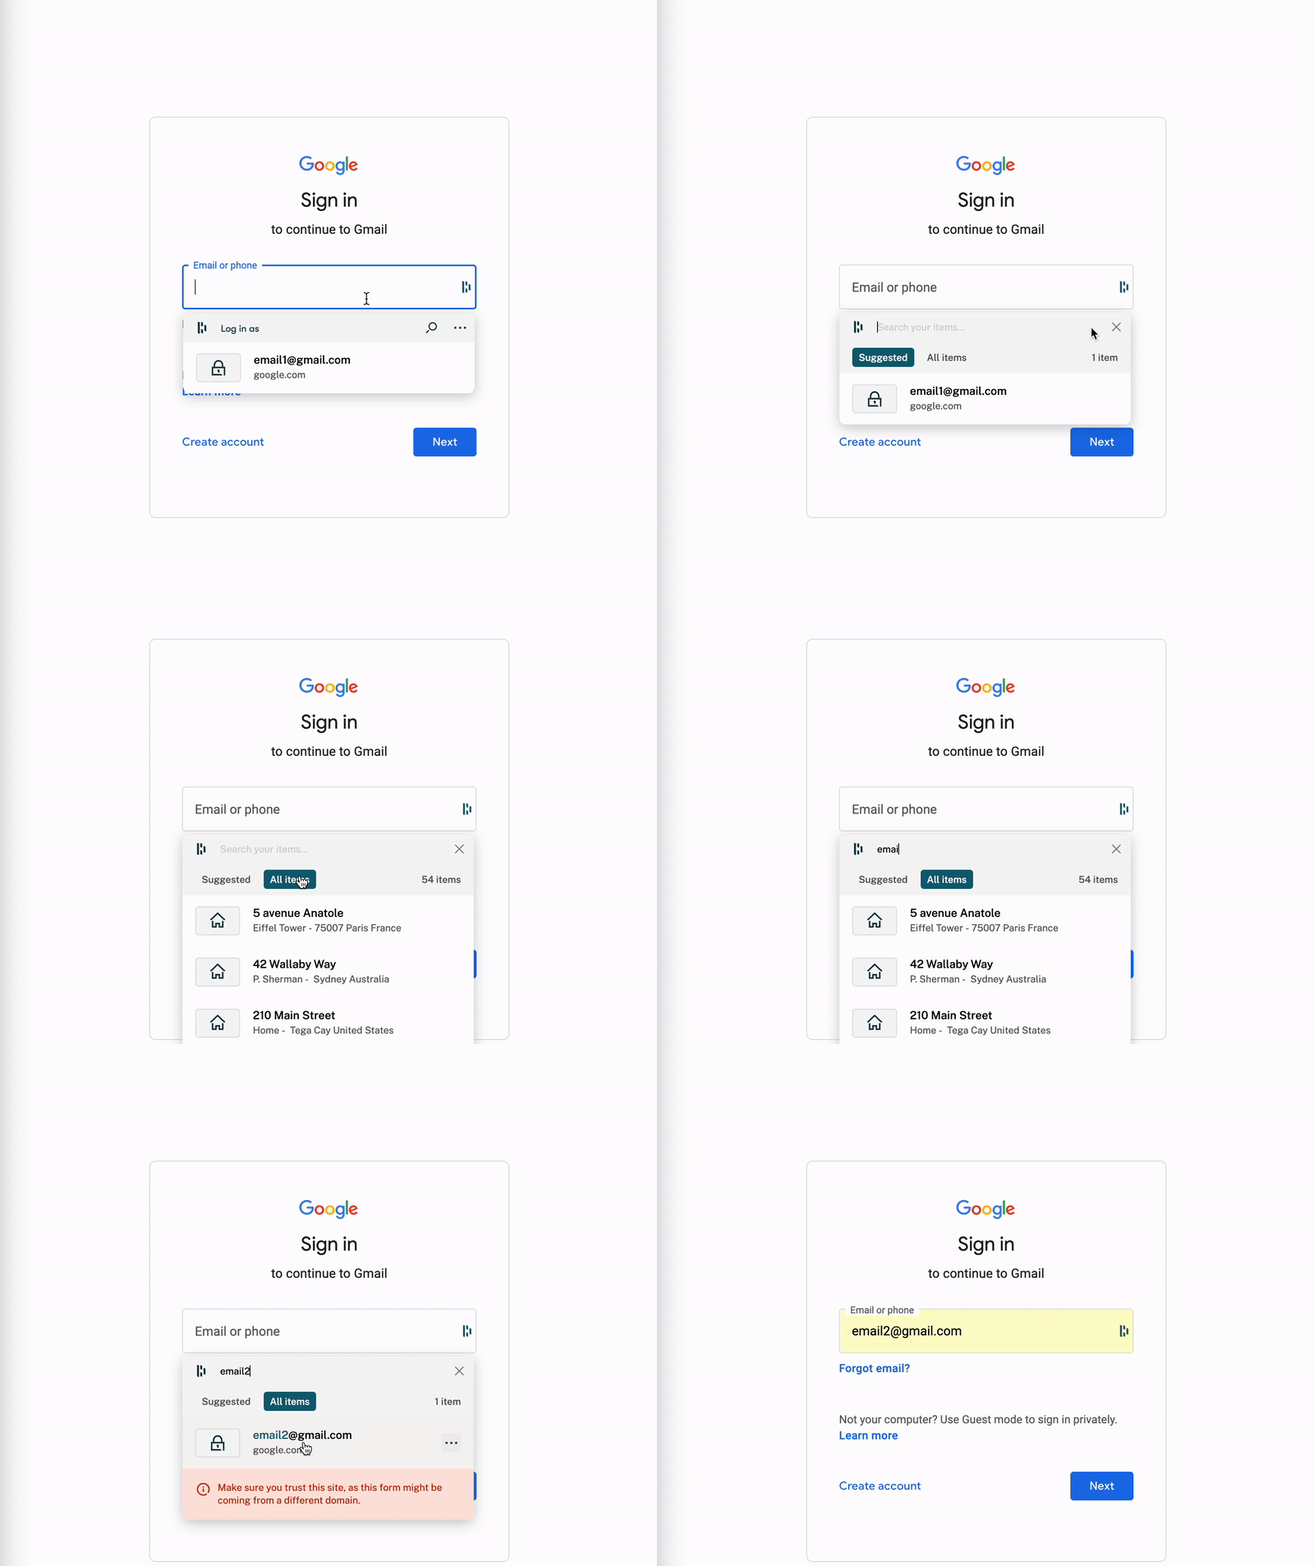
Before: Items in the Autofill menu were ordered by last used. This saved time if you often logged in to the same accounts, but for many people—especially IT admins who have many different logins for the same website—selecting the right item in the list was a bit of a pain. It took more time to scroll down, find the right item, and select it for Autofill than to just search, copy, and paste the login manually. And that doesn’t feel very “auto” of Autofill, does it?
Now: The search-in-autofill-menu feature shows suggested items to help you find the right Autofill option more easily. You can then quickly search and select the login or item you’re looking for, which saves time and increases the efficiency and ease of logins.
Supported platforms: Dashlane extension (Chrome, Edge, Opera, Firefox)
Dashlane’s Autofill feature isn’t just for the web extension. Learn how to turn on Autofill on your phone for an even faster experience on the go.
- Open your Autofill menu right from a text field
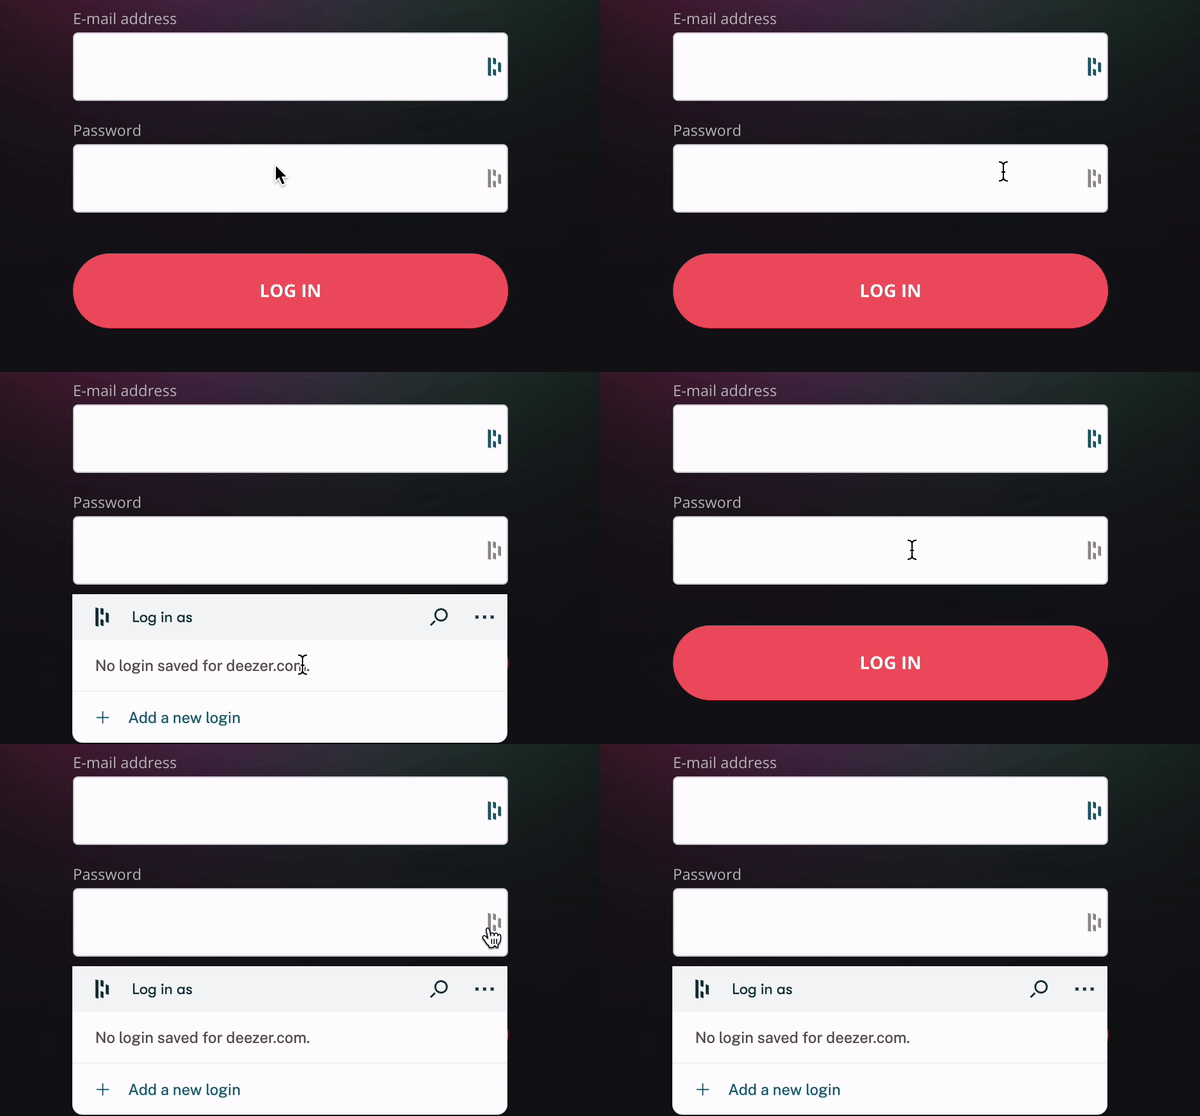
Before: If Dashlane detected a field that could be autofilled, but there was no matching information in your vault (either due to a bug or because you hadn’t saved any logins for that site), Dashlane displayed a gray D icon to indicate nothing was available. This was a bit confusing because it was just a visual cue—nothing happened when you selected the D.
Now: When you come across a gray D icon, you can select it to open the Autofill menu, even if Dashlane didn’t detect a matching item. Then, you can either add a new item or select the magnifying glass to search for the right items. This change makes it easier to add a new item or fill an existing item when nothing is suggested.
For added protection, the Autofill menu shows you the website you’re currently on. That way, you can be sure you’re not filling your credentials in somewhere suspicious, like a website someone has set up to look like your email account but is really an avenue for phishing.
Pro tip: Selecting the gray D icon is just one way to use Autofill to speed up the login process. You can also right-click on a field that Dashlane hasn’t detected and select Dashlane from the right-click menu. This will open the Dashlane Autofill menu.
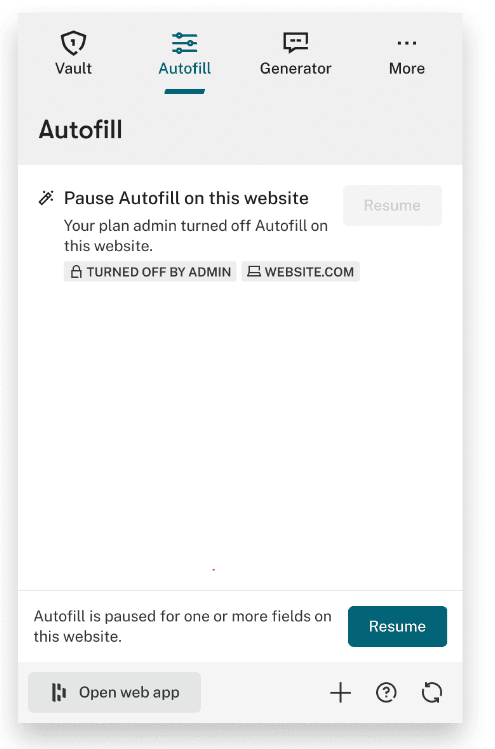
- More control over disabling Autofill
Before: Since we want to make things as simple as possible, we’ve always been proactive in enabling Autofill. But in some cases, this actually makes things less convenient. Sometimes, people don’t want to be logged in automatically, and IT admins wanted it to be clearer which websites autofill wasn’t allowed on.
Now: We’ve made it easier to turn off autofill on websites you don’t want to log in to automatically. And when IT admins disable Autofill on a website for their organization, employees get clear visibility.
- Improved Spanish Autofill performance
Before: Dashlane’s Autofill analysis was initially supported in 3 languages: English, French, and German. This meant that Autofill didn’t always perform as well on Spanish websites.
Now: We’ve since improved our Autofill analysis, which has made a big difference in our Autofill performance on Spanish language webpages. Now, Spanish-speaking users get the same seamless Dashlane Autofill experience as English, French, and German users. ¡Estupendo!
Dashlane’s award-winning UX would not be possible without customer feedback. We appreciate your perspective so we can make improvements like these! Now that you can further customize your Autofill experience, you’ll have faster access to what you want when you want it. And stay tuned: we’re already hard at work on further optimizations to make logging in one less thing to think about.
Do you have questions on these or any other Dashlane features? Our Help Center has more information and team members standing by. Not yet a Dashlane user? Getting started is simple, and we’ve got the plan for you.
Sign up to receive news and updates about Dashlane
